First official Project 52 photo!!
The idea behind this self-portrait is all about being present and aware. I recently sat a Ten-Day Vipassana Mediation Course that taught me so much about living a peaceful and positive life, and this inspired me to create something that symbolized the peace on the inside, even while things might be going crazy on the outside. While thumbing through photos on 500px (which is one of my favorite places to go through tons of amazing photography and become inspired), I came across a beautiful black and white photo of a man with his hands over his face, but his eyes, nose, and lips blended into the skin on his hands.
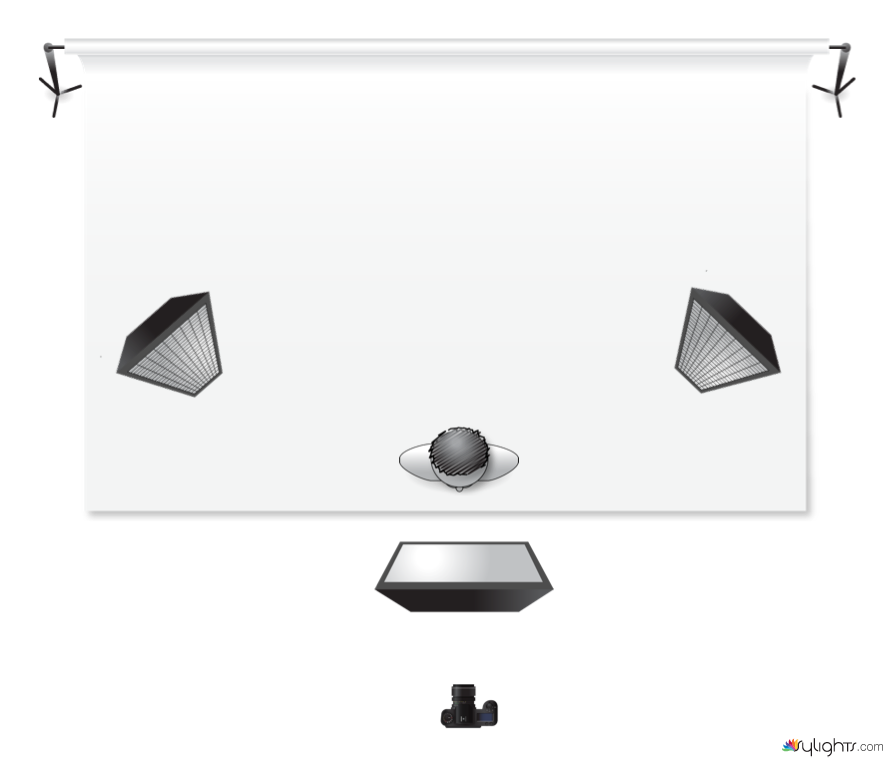
At first, I wanted to recreate this but add on to it by covering my ears with a second set of hands (aiming to cover most of the human senses) and blending those into my hands, but I continued to shoot other ideas as well (just in case it didn’t turn out the way I wanted it to). Let’s talk about lighting setup –

I had just gotten two new soft/strip boxes with grids that I was excited to try out, so I decided to have those as soft rim lights on both sides and slightly behind me. I also got a new Heavy Duty C Stand with Boom (which I never plan on taking out of the house because its ridiculously heavy…) that I threw a soft box on and put in front and above me (so the camera could shoot just below it).
All three had Canon 430ex’s shooting into the back of the boxes (they all are lined with a reflective surface, that way once it bounces off of that and hits the white screen it is evenly diffused and there are no hotspots). This triangular three-light setup is one of my favorites because it produces a very even, pleasant looking portrait, but it also allows you to play with those rim lights to change the balance/effect (harder, softer, lighter, darker, etc.).
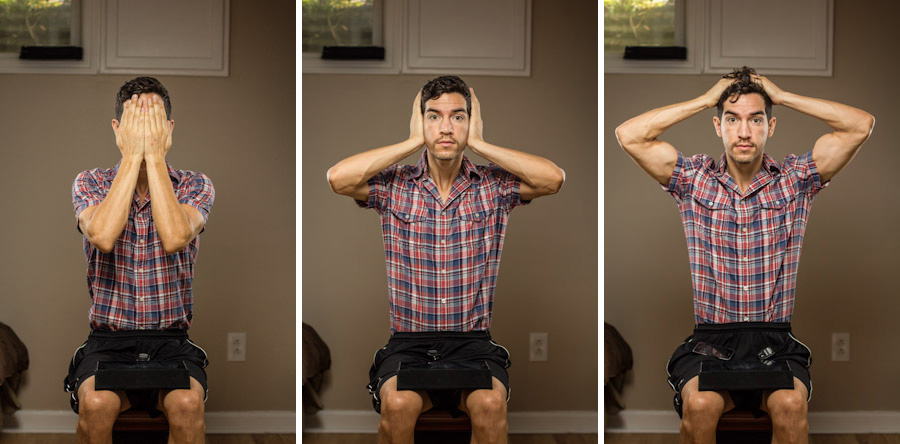
Here are the three images that made the final cut –

As you can see, I’m in a basement sitting in gym shorts on a small room heater with an iPad and trigger in my lap. Let me explain the last two items… you’re on your own for the first few.
I shoot with YongNuo Triggers which consist of a transmitter (that I place on the hotshot of my camera) and a few receivers (which connect to the bottom of my speedlights). Anytime I take a photo, the transmitter shoots that signal to the receivers which sets off the flashes. I got myself a second pair (one transmitter and one receiver) along with a shutter release cable that connects my receiver to my camera’s shutter release port. This second set I primarily use to trigger my camera to take a photo by holding the transmitter in my hand and pressing the button, which sends the signal to the receivers, which is connected to my camera, which takes the photo. When both sets are combined, it allows me to trigger my camera while also setting off the flashes, which is really useful for self-portraits. Let’s see if I can break down that chain of actions…
Press the button on Transmitter A > Receiver A receives the signal > The camera takes the photo > Transmitter B is set off > Receivers B set off the flashes they are attached to > Light!
You would think that using just one transmitter and the four receivers on the same channel would work fine, but unfortunately the flashes seem to go off sooner (and faster) then the shutter in my camera, and I also wanted a 2 second delay so I didn’t have to hold the trigger in my hand while the photo was taken. And that is the story of how I wrapped my mind around the situation and came up with this chain-of-triggers system that allows me to have do both actions wirelessly.
I was also shooting tethered for this shoot, which is something I prefer to do if I am able to. This means that my camera was connected to my MacBook Pro (via a USB Cable) and I set up Lightroom so that every time I took a photo it would show up (after a few seconds) on the computer screen. Because my camera has to be connected via a 3-foot USB cable, it doesn’t always make it easy to see the photos on the screen while taking self-portraits. I went a step further and found a great app for my iPad called Air Display that allows me to view (and control) what’s happening on my MacBook Pro. This way, I don’t have to get up and walk over to see the most recent photo, which would cause me to change my position (which you don’t want for compositing) and possibly lose my focus (I tend to focus once, make sure it’s correct, and then put it in Manual Focus and fire away).
That was super nerdy and informative, but hopefully someone gets something out of it…
I decided to create another home-made wall from scratch (matching the shade of dark-ish blue on my shirt) which is as follows –

Pretty much the same technique as last time (linear gradient, radial gradient, light and dark brushes, and noise). As far as compositing, I brought the layers of myself in one at a time based on what I wanted background to foreground. I started with the hands grabbing hair, then hands over the ears, and finally hands over the face, making use of layer masks to blend the three together. I also duplicated the photo of me with my hands over my ears to mask and blend the eyes/nose/mouth/moustache into my hands. I made a duplicated layer of the 6-armed Rob Rice to create a realistic shadow on the wall, and did a high-pass filter to make it all pop.
And that’s about it! I promise to make up for this nerdy post this week by posting a photo filled with girls in bikinis next week.
-Rob Rice